21 DIY Jewelry Organizers: A Practical and Stylish Way to Store Your Collection
Discover 21+ creative and practical DIY jewelry organizers that will help you keep your jewelry collection organized and easy to access. From hanging organizers to box organizers and everything in between, there is a DIY solution for every type of jewelry and every level of space. Personalize your organizer with paint, stickers, beads, or other decorations to make it truly one-of-a-kind and reflect your personal style. Learn how to create your own diy jewelry holder today!
If you're like most people, you probably have a collection of jewelry that's constantly growing and expanding. It can be difficult to keep track of all your pieces, and before you know it, your jewelry box is overflowing and disorganized. That's where DIY jewelry organizers come in.
DIY jewelry organizers are a great idea and a creative and practical way to store jewelry and display your jewelry, while also adding a personal touch to your space and providing easy access. They can be as simple DIY project or as elaborate as you like and can be customized to fit your specific needs and style.
A jewelry organizer is a perfect way to transform into a jewelry display that levels up even costume jewelry into a work of art.
In this article, we'll explore the different types of diy jewelry organizer ideas and jewelry storage solutions, the materials you can use to create them, and step-by-step instructions for making your own. We'll also share some ideas for personalizing your organizer to make it truly one-of-a-kind. So let's get started!
DIY jewelry organizers are homemade storage solutions for jewelry organization and displaying jewelry items. They can be as simple as a basic box or jewelry trays, using old picture frames or as elaborate as a hanging jewelry organizer with multiple compartments and hooks.
DIY jewelry organizers allow you to take control of your jewelry collection and create a customized storage solution that fits your specific needs and style. They are an alternative to traditional jewelry boxes and organizers that can be purchased at stores, and offer the opportunity to get creative and personalize your storage solution.
There are countless options for DIY jewelry organizers, ranging from hanging organizers, diy wall jewelry organizer, and box organizers that can be placed on a dresser or vanity. Some DIY jewelry organizers are designed to be functional, while others are more decorative and can be used to add a touch of personal style to a room.
No matter what your jewelry collection looks like, there is an easy diy jewelry organizer out there that will work for you. So if you're tired of digging through piles of tangled mess of necklaces and mismatched stud earrings, consider creating your own DIY jewelry organizer and get your collection organized once and for all.
Importance of organizing jewelry
Jewelry organization is important for a number of reasons. Not only does it make it easier to find and access the pieces you want to wear, it also is the best way to protect your jewelry from damage and loss.
When jewelry is not properly organized, it can become tangled, scratched, or broken. This can lead to costly repairs or even permanent damage to your favorite pieces. By organizing your jewelry, you can ensure that it is stored in a safe and secure way, helping to protect your investment.
In addition to protecting your jewelry, organizing into some sort of jewelry cabinet can also save you time and frustration. When you know exactly where everything is, you can quickly and easily find the piece you want to wear, rather than wasting time searching through piles of tangled necklaces and mismatched earrings.
Overall, organizing your jewelry is an important step in taking care of your collection and making sure it stays in good condition. Whether you choose to use a traditional jewelry box or create your own DIY jewelry organizer, taking the time to organize your jewelry will pay off in the long run.
Benefits of using DIY jewelry organizers
There are many benefits to using DIY jewelry organizers. One of the main benefits is the ability to customize the organizer to fit your specific needs and style. When you make your own jewelry organizer, you have control over the size, shape, and design, ensuring that it meets your unique storage needs. You can make separate holders for type of jewelry. For example bracelet holders or long necklaces holders or even a ring case.
27 Bedroom Organization Tips for a Clutter-Free Space
Another benefit of DIY jewelry organizers is their cost-effectiveness. While store-bought organizers can be expensive, making your own allows you to save money while still getting the storage solution you need. Plus, you can often use materials that you already have on hand, making it an even more budget-friendly option.
In addition to being cost-effective, DIY jewelry organizers are also a great way to add a personal touch to your space. Whether you choose to paint your organizer a specific color or add your own decorative elements, making your own jewelry organizer allows you to express your style and creativity.
Overall, the benefits of using DIY jewelry organizers include the ability to customize the organizer to fit your specific needs, the cost-effectiveness of making your own, and the opportunity to add a personal touch to your space.
Types of DIY jewelry organizers
There are many different types of DIY jewelry organizers that you can make, each with its own unique features and benefits. Here are six common types of DIY jewelry organizers:
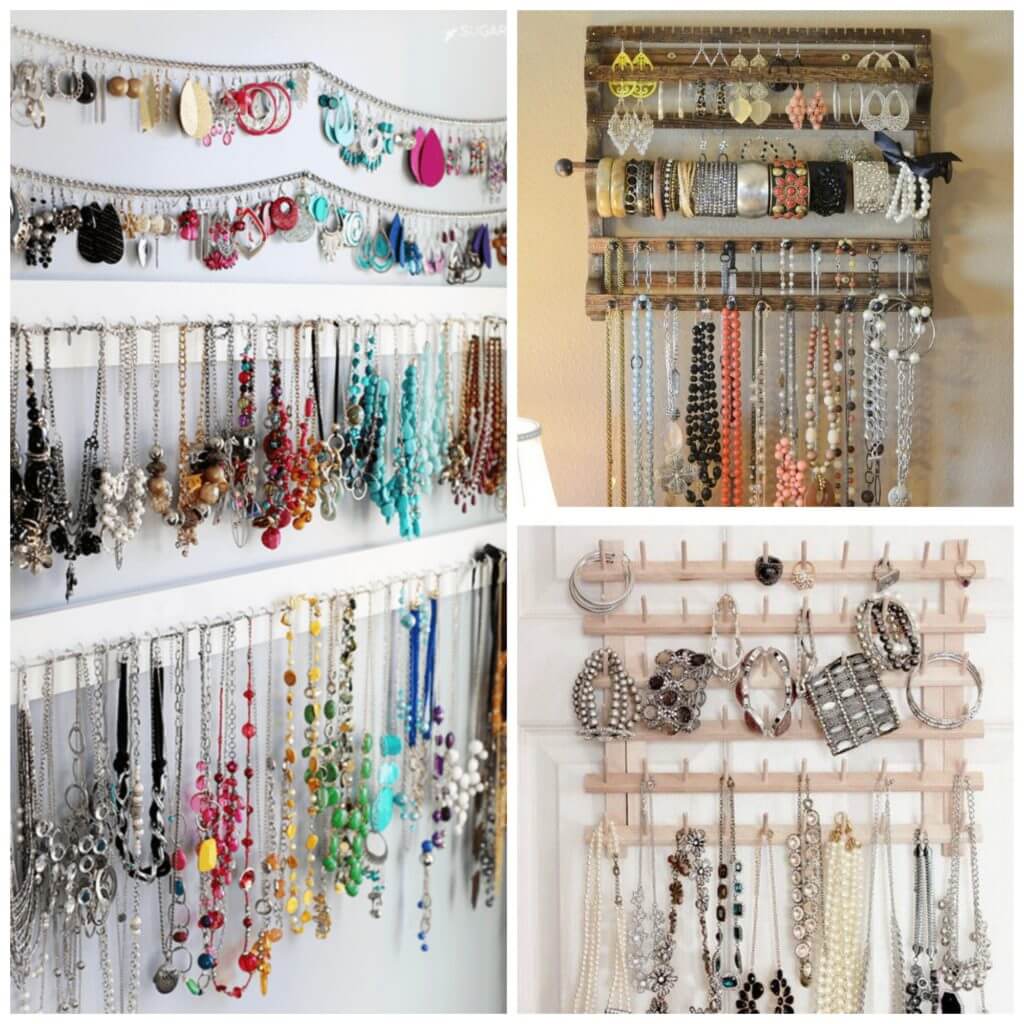
- Hanging organizers: These organizers are designed to be hung on a wall or door and typically have multiple compartments or decorative hooks for storing and displaying jewelry. They can be made from a variety of materials, such as wood, metal, or plastic, and are a great option for those with limited space.
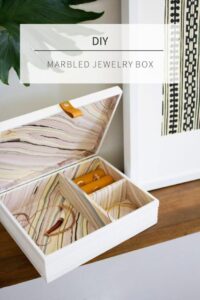
- Box organizers: Box organizers are a simple and practical way to store and organize jewelry. They can be made from a variety of materials, including cardboard, wood, or plastic, and can be placed on a dresser or vanity. Box organizers are perfect for storing smaller pieces of jewelry, such as earrings and rings.
- Display organizers: Display organizers are designed to show off your jewelry collection and add a decorative touch to your space. They can be made from a variety of materials, such as acrylic, metal, or wooden dowels, and often have multiple compartments or tiers for displaying different types of jewelry.
- Tray organizers: Tray organizers are a versatile option for organizing and storing jewelry. They can be placed on a dresser or vanity and are perfect for storing larger pieces of jewelry. They make a great bracelet and necklace holder. Tray organizers can be made from a variety of materials, including wood, metal, or plastic.
- Tree-shaped organizers: Tree-shaped organizers are a unique and stylish way to store and display jewelry. They are typically made from wood or metal and have multiple branches or hooks for hanging jewelry. Tree-shaped organizers are a great option for those with a larger collection of jewelry.
- Wall-mounted organizers: A Wall-mounted organizer is a practical and space-saving option for storing and organizing jewelry. They can be made from a variety of materials, such as wood, metal, or plastic, and are designed to be mounted on a bedroom wall or door. Wall-mounted organizers are perfect for those with limited space and are a great way to keep jewelry organized and out of sight.
No matter what type of jewelry you have or how much space you have to work with, there is a DIY jewelry organizer that will work for you. So if you're looking for a creative and practical way to store and display your jewelry, consider making your own DIY jewelry organizer.
Keto Slow Cooker: 70 Recipes You Need In Your Life
Materials for DIY jewelry organizers
There are many different materials that you can use to create DIY jewelry organizers. Here are five common materials:
- Wood: Wood is a popular choice for DIY jewelry organizers because it is durable and easy to work with. It can be painted, stained, or left natural, depending on your preference. Wood is a versatile material that can be used to create a variety of different types of organizers, such as hanging organizers, box organizers, and tray organizers. A wooden frame is inexpensive at the thrift. A vintage frame would provide so much character.
- Cardboard: Cardboard is a budget-friendly material that is easy to work with and can be cut and shaped into a variety of different shapes and sizes. It is a good choice for creating box organizers or smaller organizers for storing smaller pieces of jewelry.
- Acrylic: Acrylic is a clear plastic material that is lightweight and durable. It is a good choice for creating display organizers, as it allows you to see your jewelry collection while also protecting it from damage.
- Metal: Metal is a durable material that is perfect for creating hanging organizers or wall-mounted organizers. It is resistant to damage and can be painted or left natural, depending on your preference. Wire mesh or a decorative metal sheet makes a great base to hang on.
- Plastic: Plastic is a lightweight and budget-friendly material that is easy to work with. It is a good choice for creating tray organizers or box organizers and can be painted or decorated to add a personal touch.
No matter what type of material you choose, it's important to consider the weight of your jewelry collection when selecting the material for your DIY jewelry organizer. Make sure that the material you choose is strong enough to support the weight of your jewelry and will not break or bend under the weight.
Steps for creating DIY jewelry organizers
Creating a DIY jewelry organizer is a fun and rewarding project that allows you to take control of your jewelry collection and create a customized storage solution that fits your specific needs and style. Here are four steps for creating your own DIY jewelry organizer:
Step 1: Choose a type of organizer and gather materials: The first step in creating a DIY jewelry organizer is to decide on the type of organizer you want to make and gather the necessary materials. This will depend on your needs and the materials you have on hand. Some options to consider include wood, cardboard, acrylic, metal, or plastic. The whole thing need not be expensive. Before starting at the craft store, you can purchase many of the materials at Dollar Tree and the thrift store.
Step 2: Measure and cut materials to size: Once you have your materials, measure and cut them to the size and shape you need. This will depend on the type of organizer you are making and the size of your jewelry collection. It is important to be precise when measuring and cutting to ensure that your organizer fits together properly.
Step 3: Assemble the organizer: Once you have your materials cut to size, it's time to assemble the organizer. This will involve attaching the various pieces together using hot or wood glue, nails, screws, or another type of fastener. Follow the instructions for your specific organizer or use your own design to create a unique organizer that meets your needs.
Step 4: Personalize the organizer: The final step in creating your DIY jewelry organizer is to personalize it to fit your style and needs. This can involve painting the organizer a different color, adding stickers or decals, embellishing with beads or sequins, or attaching photos or other mementos. Be creative and have fun with this step to make your organizer truly one-of-a-kind.
With these four steps, you can easily create a DIY jewelry organizer that meets your specific needs and adds a personal touch to your space.
Ideas for personalizing DIY jewelry organizers
Personalizing your DIY jewelry organizer is a fun and creative way to make it truly one-of-a-kind and reflect your personal style. Here are five ideas for personalizing your DIY jewelry organizer:
- Paint the organizer a different color: Adding a coat of paint to your organizer is an easy way to add a pop of color and make it your own. Choose a color that matches your room decor or go with a bold, statement-making color for a more dramatic look.
- Add stickers or decals: Decorating your organizer with stickers or decals is a quick and easy way to add some personality. Choose stickers or decals that reflect your interests or style, or create your own using a vinyl cutter or by hand.
- Embellish with beads or sequins: Adding beads or sequins to your organizer is a fun and creative way to add some sparkle and shine. Use hot glue to attach the beads or sequins to your organizer in a pattern or design of your choice.
- Attach photos or other mementos: Adding personal touches to your organizer, such as photos or other mementos, is a great way to make it meaningful and sentimental. Use glue or double-sided tape to attach the items to your organizer, or create a collage using a variety of items.
- Add a personalized touch: There are endless ways to personalize your DIY jewelry organizer. Consider adding a monogram, a quote, or other personal touch to make it truly one-of-a-kind.
No matter which personalization method you choose, the key is to have fun and let your creativity shine. With these ideas and your own personal touch, you can create a DIY jewelry organizer that is truly one-of-a-kind and reflects your unique style.
personalizing DIY jewelry organizers
Paint the organizer a different color: Adding a coat of paint to your organizer is an easy way to add a pop of color and make it your own. Choose a color that matches your room decor or go with a bold, statement-making color for a more dramatic look.
Add stickers or decals: Decorating your organizer with stickers or decals is a quick and easy way to add some personality. Choose stickers or decals that reflect your interests or style, or create your own using a vinyl cutter or by hand.
Embellish with beads or sequins: Adding beads or sequins to your organizer is a fun and creative way to add some sparkle and shine. Use hot glue to attach the beads or sequins to your organizer in a pattern or design of your choice.
Attach photos or other mementos: Adding personal touches to your organizers, such as photos or other mementos, is a great way to make it meaningful and sentimental. Use glue or double-sided tape to attach the items to your organizer, or create a collage using a variety of items.
No matter which personalization method you choose, the key is to have fun and let your creativity shine. With these ideas and your own personal touch, you can create a DIY jewelry organizer that is truly one-of-a-kind and reflects your unique style.
DIY jewelry organizers are a practical and creative way to store and display your jewelry collection. With a wide range of materials and types of organizers to choose from, you can easily create a customized storage solution that fits your specific needs and style.
Personalizing your organizer with paint, stickers, beads, or other decorations is a fun and easy way to make it truly one-of-a-kind and reflect your personal style. Whether you have a small collection of jewelry or a large and varied one, there is a DIY jewelry organizer that will work for you.
So if you're looking for a fun and practical way to organize your jewelry, consider making your own DIY jewelry organizer today. Try one of the ideas I've curated below:
Thread Organizer Becomes Jewelry Organizer
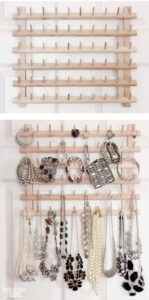
A thread organizer is a handy storage solution for organizing and organizing spools of thread, but did you know that it can also be repurposed as a jewelry organizer? By simply removing the spools of thread and replacing them with your jewelry, you can create a unique and functional organizer that is perfect for storing and displaying your earrings, necklaces, and other small pieces of jewelry.
The individual compartments in a thread organizer are perfect for organizing and separating your jewelry, and the compact size of the organizer makes it easy to store on a dresser, vanity, or in a drawer.
Plus, by repurposing a thread organizer as a jewelry organizer, you can save money and reduce waste, making it a sustainable and eco-friendly choice. So next time you're looking for a way to organize your jewelry, consider giving a thread organizer a new life as a jewelry organizer.
A cigar box is a small and stylish container that is perfect for repurposing as a jewelry organizer. With its sturdy construction and attractive design, a cigar box is a great way to store and display your jewelry in a unique and eye-catching way.
To turn a cigar box into a jewelry organizer, simply remove any cigar-related items from the box and then use the compartments, dividers, or open space inside to store and organize your jewelry.
A cigar box is a great choice for storing and organizing smaller pieces of jewelry, such as earrings, rings, and smaller necklaces. The compact size of the box makes it easy to store on a dresser, vanity, or in a drawer, and the attractive design of the box adds a touch of sophistication and style to your jewelry storage.
So next time you come across an empty cigar box, consider repurposing it as a jewelry organizer for your collection.
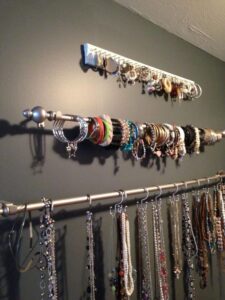
Curtain Rod Turned Jewelry Organizer
A curtain rod may seem like an unlikely choice for a jewelry organizer, but with a little creativity and some basic supplies, it can be transformed into a functional and stylish storage solution for your jewelry collection.
To turn a curtain rod into a jewelry organizer, you will need to gather a few supplies, such as S-hooks, jump rings, or other small items that you can use to hang your jewelry from the rod. You can also use small baskets or other containers to create compartments for organizing and storing your jewelry.
Once you have your supplies, simply hang the curtain rod in a convenient location and use the S-hooks or jump rings to hang your jewelry from the rod. You can arrange your jewelry by type, color, or any other criteria that makes sense for your collection.
The compact size of the curtain rod makes it a great choice for smaller spaces, and the hanging design allows you to easily see and access your jewelry. So if you're looking for a unique and creative way to organize your jewelry, consider using a curtain rod as a jewelry organizer.
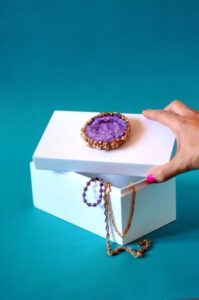
Crystal-Topped Jewelry Box
A plain box can easily be transformed into a stylish and glamorous jewelry organizer with the addition of a few crystals. Whether you choose to add crystals to the outside of the box or the inside, this simple and elegant touch can take your jewelry storage to the next level.
To add crystals to a plain box, you will need a selection of crystals, a hot glue gun, and some basic supplies such as scissors and a ruler. Start by deciding on the placement of your crystals and sketching out a design on a piece of paper. Once you have a plan in place, use the hot glue gun to attach the crystals to the box, following your design as closely as possible.
You can add crystals to the outside of the box to create a sparkling and elegant exterior, or you can add them to the inside of the box to create a glamorous and luxurious interior for your jewelry. Either way, the addition of crystals to a plain box is a simple and effective way to turn it into a stunning and sophisticated jewelry organizer.
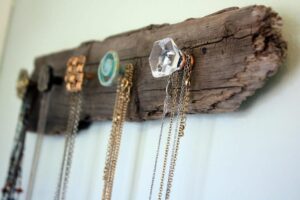
Rustic Jewelry Organizer
A piece of driftwood and some pretty knobs can be combined to create a unique and rustic jewelry organizer. Driftwood has a natural and organic feel that adds warmth and character to any space, and attaching knobs to the wood provides a functional and stylish way to store and display your jewelry.
To create this type of jewelry organizer, you will need to gather a piece of driftwood, some pretty knobs, and some basic supplies such as screws, a drill, and a screwdriver.
Once you have your materials, simply attach the knobs to the driftwood using screws and a drill. You can attach the knobs in a straight line or in a more random pattern, depending on your preferences and the size and shape of your driftwood piece.
Once the knobs are attached, you can hang your jewelry from them using jump rings or other small items. The combination of the rustic driftwood and the pretty knobs creates a unique and eye-catching jewelry organizer that adds a touch of natural beauty and charm to your space.
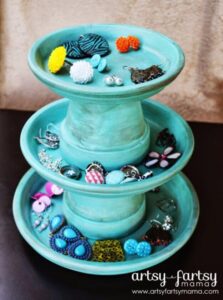
DIY Jewelry Stand
Terra cotta pots in varying sizes can be transformed into a unique and stylish jewelry organizer with a little bit of paint and glue. By painting the pots in coordinating colors and then gluing them together in a tiered arrangement, you can create a functional and attractive storage solution for your jewelry.
To create this type of jewelry organizer, you will need a selection of terra cotta pots in varying sizes, some paint, glue, and some basic supplies such as brushes and a ruler. Once you have your materials, start by painting the pots in the colors of your choice. You can choose to paint all of the pots the same color, or you can mix and match different colors for a more eclectic look.
Once the pots are painted, use glue to attach them together in a tiered arrangement. You can glue the side of the pot by side or stack them on top of each other, depending on the size and shape of your pots and the amount of space you have available.
Once the pots are attached, you can use them to store and display your jewelry, organizing it by type, color, or any other criteria that makes sense for your collection. The combination of the painted terra cotta pots and the tiered arrangement creates a rustic and charming jewelry organizer that adds a touch of whimsy and style to your space.
Earring Holder
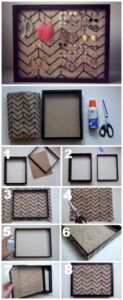
A picture frame with the glass removed and burlap added can be transformed into a stylish and rustic jewelry organizer. By attaching the burlap to the back of the frame and then hanging your jewelry from it using jump rings or other small items, you can create a unique and functional storage solution for your collection.
To create this type of jewelry organizer, you will need a picture frame, some burlap, a staple gun, and some basic supplies such as scissors and a ruler. Once you have your materials, start by removing the glass from the picture frame and then attaching the burlap to the back of the frame using a staple gun.
You can wrap the burlap around the frame and secure it in place with staples, or you can cut the burlap to fit the frame and then attach it with staples. Once the burlap is attached to the frame, you can hang your jewelry from it using jump rings or other small items.
The combination of the rustic burlap and the frame creates a charming and stylish jewelry organizer that adds a touch of texture and character to your space.
DIY Gold Leaf Trinket Holder
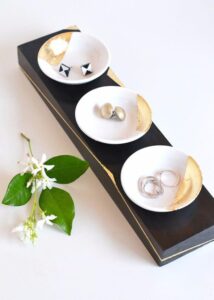
This piece of wood has been painted a vibrant color and three trinket bowls have been attached to it. The trinket bowls are perfect for holding small pieces of jewelry such as rings, earrings, and bracelets.
The painted wood adds a touch of elegance and style to the overall look of the jewelry organizer. It is a practical and visually appealing way to keep your jewelry organized and easily accessible.
Whether you have a large collection of jewelry or just a few special pieces, this jewelry organizer is a great addition to any dressing table or vanity. The compact size of the organizer makes it easy to store and display, and the trinket bowls are perfect for holding a variety of different types of jewelry.
Easy Hanger Turned Jewelry Organizer
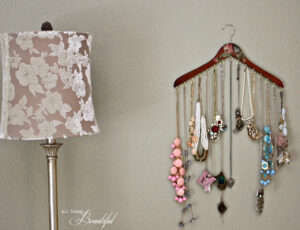
This pretty wooden hanger is a unique and stylish way to organize your jewelry. It features cup hooks that are perfect for hanging necklaces, bracelets, and other types of jewelry.
The wooden hanger itself has a natural wood finish that adds a rustic touch to the overall look of the organizer. It is a practical and visually appealing way to keep your jewelry organized and easily accessible.
Whether you have a large collection of jewelry or just a few special pieces, this jewelry organizer is a great addition to any dressing table or vanity. The compact size of the hanger makes it easy to store and display, and the cup hooks are perfect for hanging a variety of different types of jewelry.
Pretty Frame & Chicken Wire Jewelry Organizer
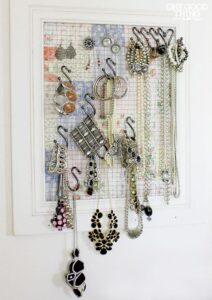
This pretty frame has been repurposed into a jewelry organizer with the addition of chicken wire. The chicken wire provides a unique and stylish way to display and organize your jewelry.
It is perfect for hanging necklaces, bracelets, and other types of jewelry. The frame itself has a charming and rustic design, with a distressed finish that adds character to the overall look of the organizer.
It is a practical and visually appealing way to keep your jewelry organized and easily accessible. Whether you have a large collection of jewelry or just a few special pieces, this jewelry organizer is a great addition to any dressing table or vanity. The compact size of the frame makes it easy to store and display, and the chicken wire is perfect for displaying a variety of different types of jewelry.
DIY Jewelry Organizer
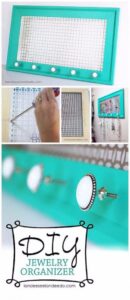
This painted board is a unique and stylish way to organize your jewelry. It features cup hooks that are perfect for hanging necklaces, bracelets, and other types of jewelry.
The board itself has been painted a vibrant color that adds a pop of personality to the overall look of the organizer. It is a practical and visually appealing way to keep your jewelry organized and easily accessible.
Whether you have a large collection of jewelry or just a few special pieces, this jewelry organizer is a great addition to any dressing table or vanity. The compact size of the board makes it easy to store and display, and the cup hooks are perfect for hanging a variety of different types of jewelry.
Framed Organizer
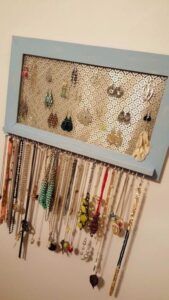
This frame has been transformed into a jewelry organizer with the addition of pretty, intricate metalwork. The metalwork provides a unique and stylish way to display and organize your jewelry.
It is perfect for hanging necklaces, bracelets, and other types of jewelry. The frame itself has a charming and elegant design, with a classic finish that adds sophistication to the overall look of the organizer.
It is a practical and visually appealing way to keep your jewelry organized and easily accessible. Whether you have a large collection of jewelry or just a few special pieces, this jewelry organizer is a great addition to any dressing table or vanity.
The compact size of the frame makes it easy to store and display, and the intricate metalwork is perfect for displaying a variety of different types of jewelry.
Jewelry Holder from a Cutlery Tray
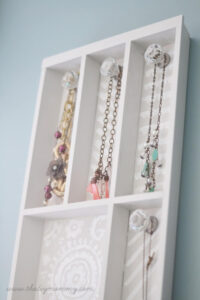
This jewelry holder has been repurposed from a cutlery tray and has been transformed into a stylish and practical way to organize your jewelry. The tray features compartments that are perfect for storing and organizing small pieces of jewelry such as rings, earrings, and brooches.
The tray itself has a sleek and modern design, with a sleek finish that adds a touch of sophistication to the overall look of the organizer. It is a practical and visually appealing way to keep your jewelry organized and easily accessible.
Whether you have a large collection of jewelry or just a few special pieces, this jewelry organizer is a great addition to any dressing table or vanity. The compact size of the tray makes it easy to store and display, and the compartments are perfect for organizing a variety of different types of jewelry.
Decorative Jewelry Holder
This frame has been transformed into a jewelry organizer with the addition of knobs and pretty, intricate metalwork. The metalwork and knobs provide a unique and stylish way to display and organize your jewelry.
The knobs are perfect for hanging necklaces, bracelets, and other types of jewelry, while the intricate metalwork adds a touch of elegance and sophistication. The frame itself has a charming and elegant design, with a classic finish that adds to the overall look of the organizer.
It is a practical and visually appealing way to keep your jewelry organized and easily accessible. Whether you have a large collection of jewelry or just a few special pieces, this jewelry organizer is a great addition to any dressing table or vanity.
The compact size of the frame makes it easy to store and display, and the combination of knobs and intricate metalwork is perfect for displaying and organizing a variety of different types of jewelry.
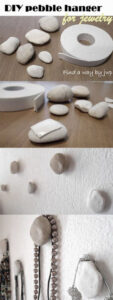
Diy Pebble Jewelry Hanger
This piece of wood has been painted a vibrant color and adorned with pebbles to create a unique and stylish jewelry organizer. The pebbles provide a natural and rustic touch to the overall look of the organizer.
They are perfect for holding small pieces of jewelry such as rings, earrings, and bracelets. The painted wood adds a touch of elegance and style to the overall look of the jewelry organizer.
It is a practical and visually appealing way to keep your jewelry organized and easily accessible. Whether you have a large collection of jewelry or just a few special pieces, this jewelry organizer is a great addition to any dressing table or vanity.
The compact size of the organizer makes it easy to store and display, and the pebbles are perfect for holding a variety of different types of jewelry.
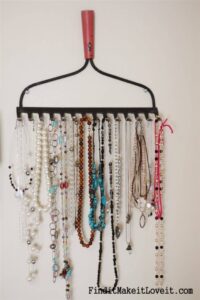
Rustic Rake Jewelry Organizer
This rustic rake end has been repurposed into a unique and stylish jewelry organizer. The rake tines provide a natural and rustic way to display and organize your jewelry.
They are perfect for hanging necklaces, bracelets, and other types of jewelry. The rake end itself has a charming and rustic design, with a distressed finish that adds character to the overall look of the organizer. It is a practical and visually appealing way to keep your jewelry organized and easily accessible.
Whether you have a large collection of jewelry or just a few special pieces, this jewelry organizer is a great addition to any dressing table or vanity. The compact size of the rake end makes it easy to store and display, and the tines are perfect for displaying a variety of different types of jewelry.
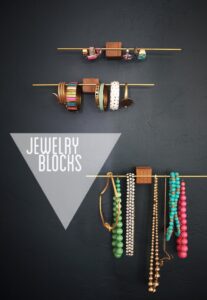
Jewelry Blocks
This small block of wood has been stained a warm, rich color and adorned with a gold metal rod to create a unique and stylish jewelry organizer.
The metal rod provides a chic and modern way to display and organize your jewelry. It is perfect for hanging necklaces, bracelets, and other types of jewelry. The block of the wood itself has a natural and rustic look, with a warm, rich finish that adds character to the overall look of the organizer.
It is a practical and visually appealing way to keep your jewelry organized and easily accessible. Whether you have a large collection of jewelry or just a few special pieces, this jewelry organizer is a great addition to any dressing table or vanity.
The compact size of the organizer makes it easy to store and display, and the gold metal rod is perfect for displaying a variety of different types of jewelry.
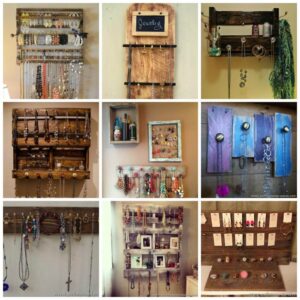
Wooden Pallets Jewelry Organizers
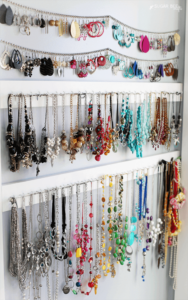
Wooden pallets have been repurposed into a variety of jewelry organizers in this collection. Each organizer has a unique and rustic design, with a distressed finish that adds character to the overall look.
The pallets have been transformed into a range of styles, including wall-mounted organizers with hooks for hanging jewelry, freestanding organizers with compartments for storing small pieces of jewelry, and tabletop organizers with trays for displaying larger items.
These jewelry organizers are a practical and visually appealing way to keep your jewelry organized and easily accessible. Whether you have a large collection of jewelry or just a few special pieces, these organizers are a great addition to any dressing table or vanity.
The compact size of the organizers makes them easy to store and display, and the variety of styles allows you to choose the perfect organizer for your jewelry collection.
DIY Jewelry Storage
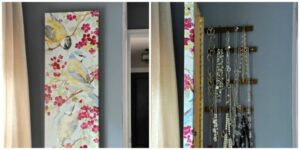
This DIY hinged door has been transformed into a unique and stylish jewelry organizer. The door has been repurposed and given a new life as a practical and visually appealing way to keep your jewelry organized and easily accessible.
The door features a variety of hooks and knobs for hanging necklaces, bracelets, and other types of jewelry. It also has compartments and trays for storing and displaying smaller pieces of jewelry such as rings, earrings, and brooches. The hinged door design allows it to be easily opened and closed, making it convenient to access your jewelry collection.
Whether you have a large collection of jewelry or just a few special pieces, this jewelry organizer is a great addition to any dressing table or vanity. The compact size of the door makes it easy to store and display, and the variety of hooks, knobs, compartments, and trays allows you to customize the organizer to suit your specific needs.
Easy Jewelry Organizer
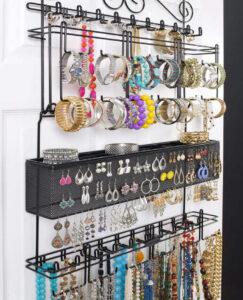
This household over-the-door organizer has been repurposed into a stylish and practical way to organize your jewelry. The organizer features a variety of hooks and compartments for hanging and storing necklaces, bracelets, and other types of jewelry. It is perfect for keeping your jewelry organized and easily accessible.
The over-the-door design allows it to be easily hung on the back of a door, saving space on your dressing table or vanity. Whether you have a large collection of jewelry or just a few special pieces, this jewelry organizer is a great addition to any room.
The compact size of the organizer makes it easy to store and display, and the variety of hooks and compartments allows you to customize the organizer to suit your specific needs.
In conclusion, DIY jewelry organizers offer a number of benefits, including the ability to customize your storage solution to fit your specific needs and style. They can help you keep your jewelry organized and easy to access, while also adding a decorative touch to your space.
By personalizing your organizer with paint, stickers, beads, or other decorations, you can make it truly one-of-a-kind and reflect your personal style. So if you're looking for a fun and practical way to organize your jewelry, consider making your own DIY jewelry organizer.
Not only will it help you keep your jewelry organized and easy to find, but it will also give you the opportunity to get creative and add a personal touch to your space. So why wait? Start organizing your jewelry collection with a DIY jewelry organizer today!


2 Comments
Sabrina
I lovw all your ideas. Thank you.
Karen Harrill
Love your ideas. I also have a huge collection of fashion jewelry and finally resorted to plastic bins and ziplock bags. For the larger bib necklaces or long multi strand beaded pieces – a sandwich bag fits the necklace easily. I use smaller craft store zip bags (2” x 3”) to keep the earrings, bracelets, pins or hair clips that best match the necklace organized – and the little bags are added to the necklace bag.
I have these in snap lock plastic stacking bins so I can quickly find the teal or purple or shiny gold or colored pearl strand I want. The empty baggies for today’s look are placed in my nightstand drawer – so I can have it ready when I remove the set at bedtime.
In getting this organized the first time – I set aside orphan earrings, bracelets that needed to be restrung (the stretch cord was no longer elastic) and items needing the clasp repaired. These are slowly getting repaired or being turned into new designs as time permits.
I am definitely wearing a larger variety of what has accumulated over 40 years and am even changing up my rings (wedding ring is constant…but others are finding a day in the sun on my right hand).